BigCommerce, a popular platform for online stores, got a major makeover in 2021 with the launch of BigCommerce V3. This new version comes with a fresh look, powerful tools for managing products, and a faster way for computers to talk to each other.
In this blog post, we’ll explain the move from BigCommerce V2 to V3. We’ll point out what’s different and why it’s a smart move. Plus, we’ll guide you step by step on how to switch over smoothly. This change is all about keeping your online store competitive and making shopping easier for your customers.
eCommerce is always changing, and with BigCommerce V3, you’re ready for what’s next. Let’s dive in and make the most of this upgrade for your online store.
Table of Contents
Comparing V2 and V3 Product Experiences and Considerations
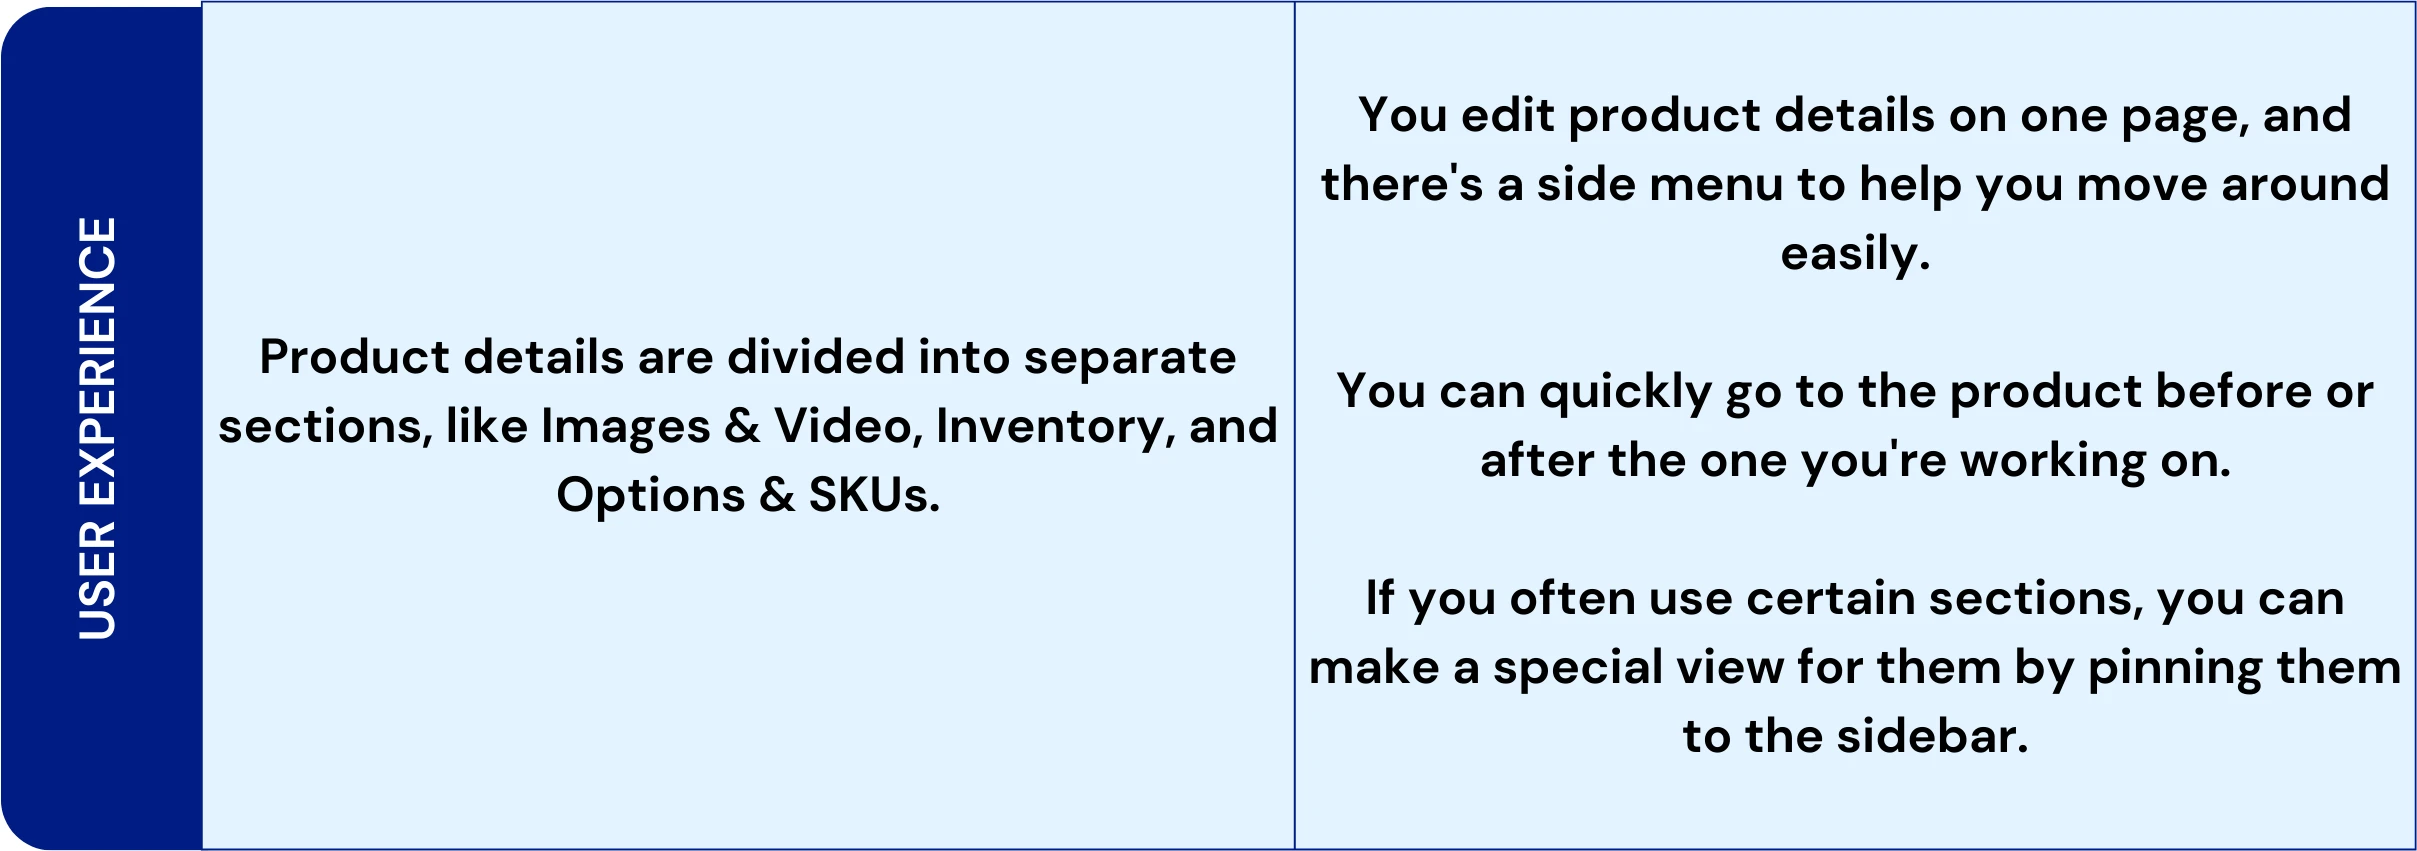
Imagine you have two stores right next to each other. One uses the old V2 way to create and manage products, and the other uses the new V3 method. You’d quickly notice that they work differently. But here’s the interesting part: even though they’re different, you’ll still see some familiar things. V3 takes what was good in V2 and makes it even better, giving you more advanced and flexible ways to deal with products in your store.

Here is a table for a quick comparison of the two experiences –


Why Upgrade to BigCommerce V3?
If your store uses the older V2 system, there are a few things to think about before moving to V3.
Key Considerations for BigCommerce V3 Migration
- You prefer to see, add, and edit all product details on a single page in the control panel instead of different tabs.
- You want to add customs info to products without using the API.
- You like to manage a product’s options right from the product page and have the choice of creating or using shared options.
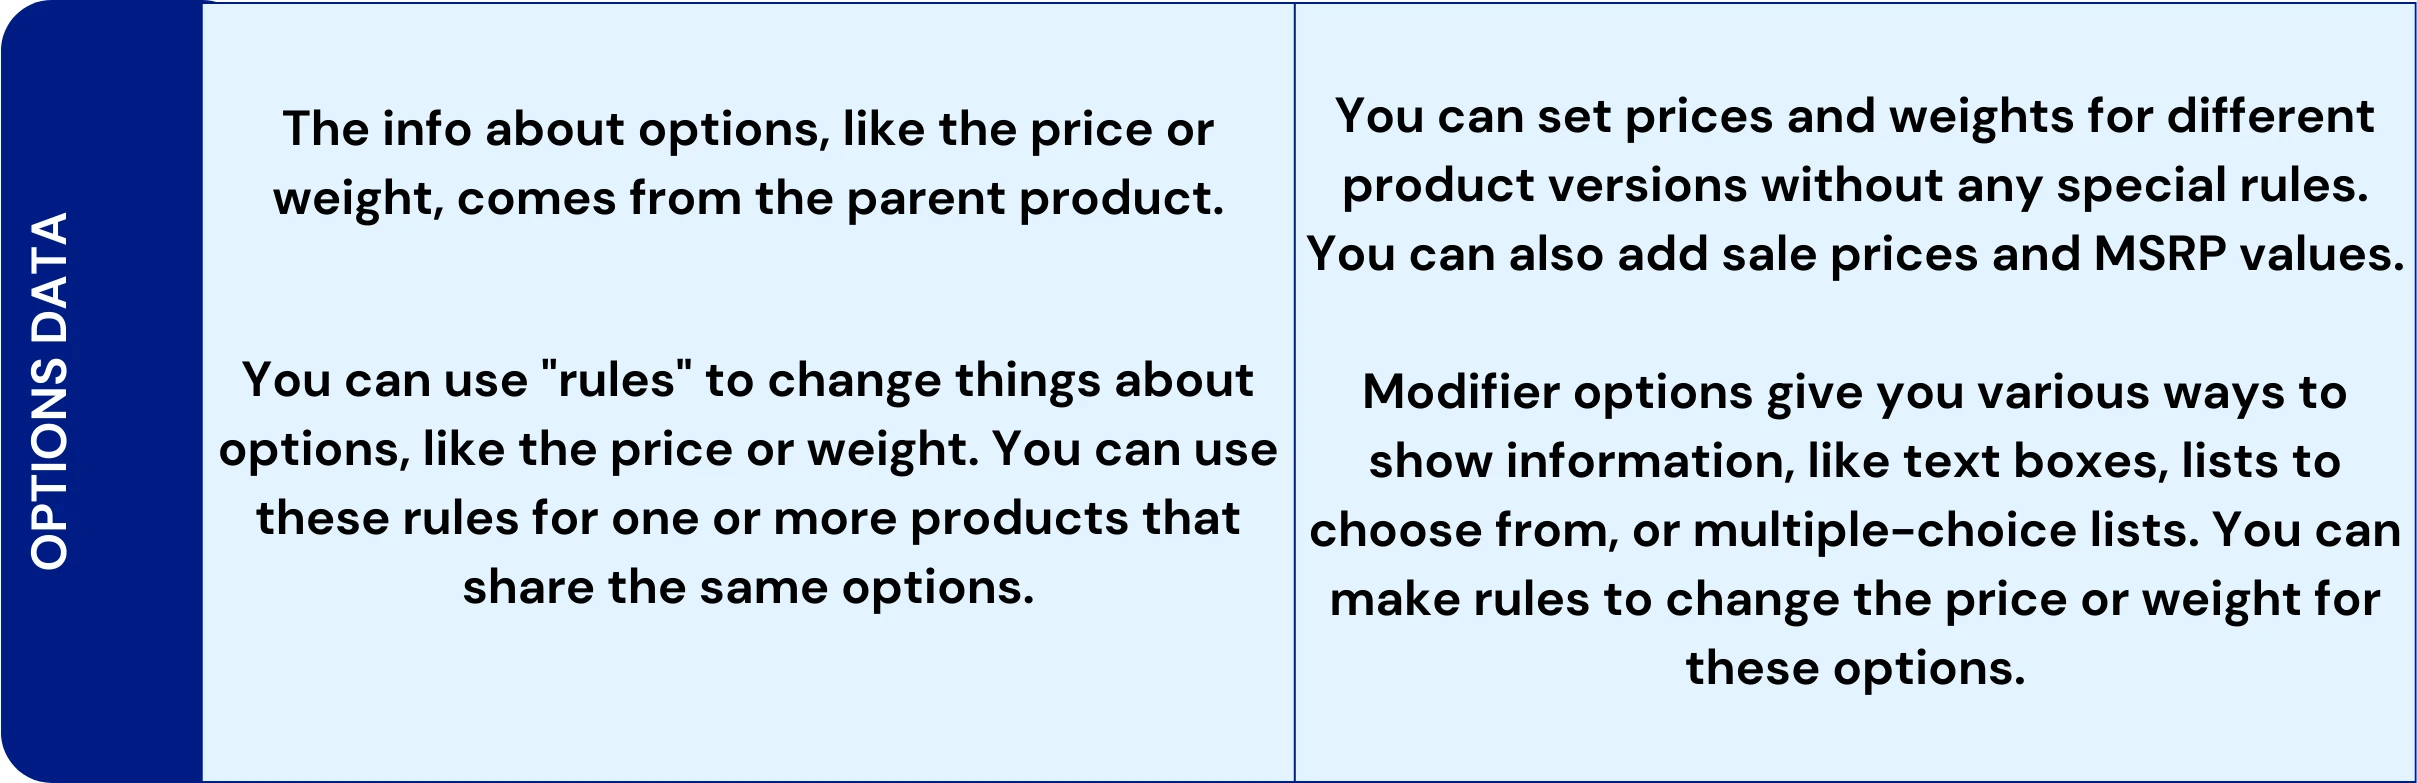
- You need to make products with options that would go over the 600 SKU limit per product by using modifier options.
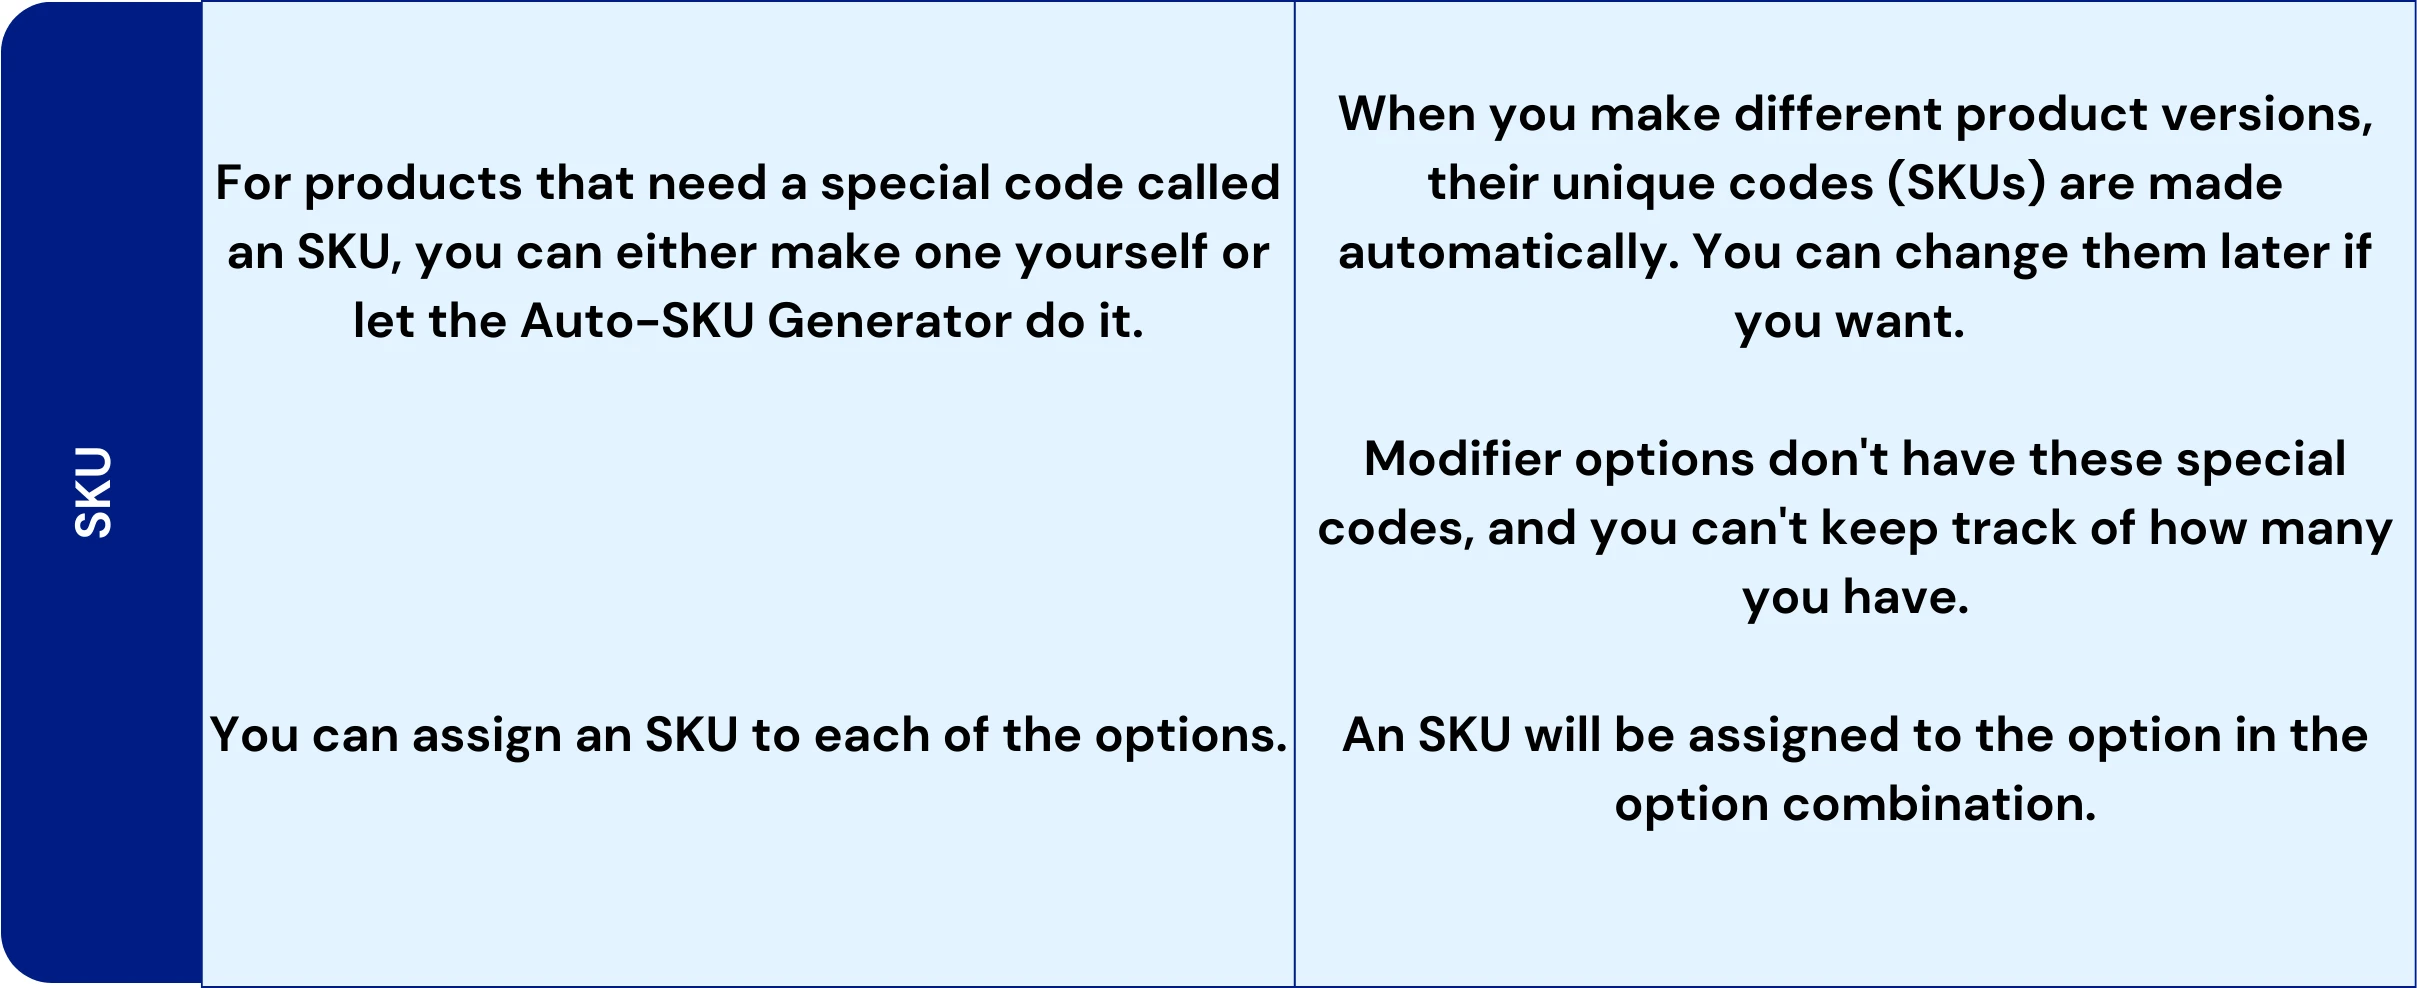
- You want SKUs to be generated automatically when you make variant options instead of entering them manually or setting up a formula in the Auto-SKU Generator.
- You want to type in specific values for product option data rather than having them come from the main product.
- You want to set special sale or MSRP prices for individual product versions.
Familiarity and Simplicity with BigCommerce V2
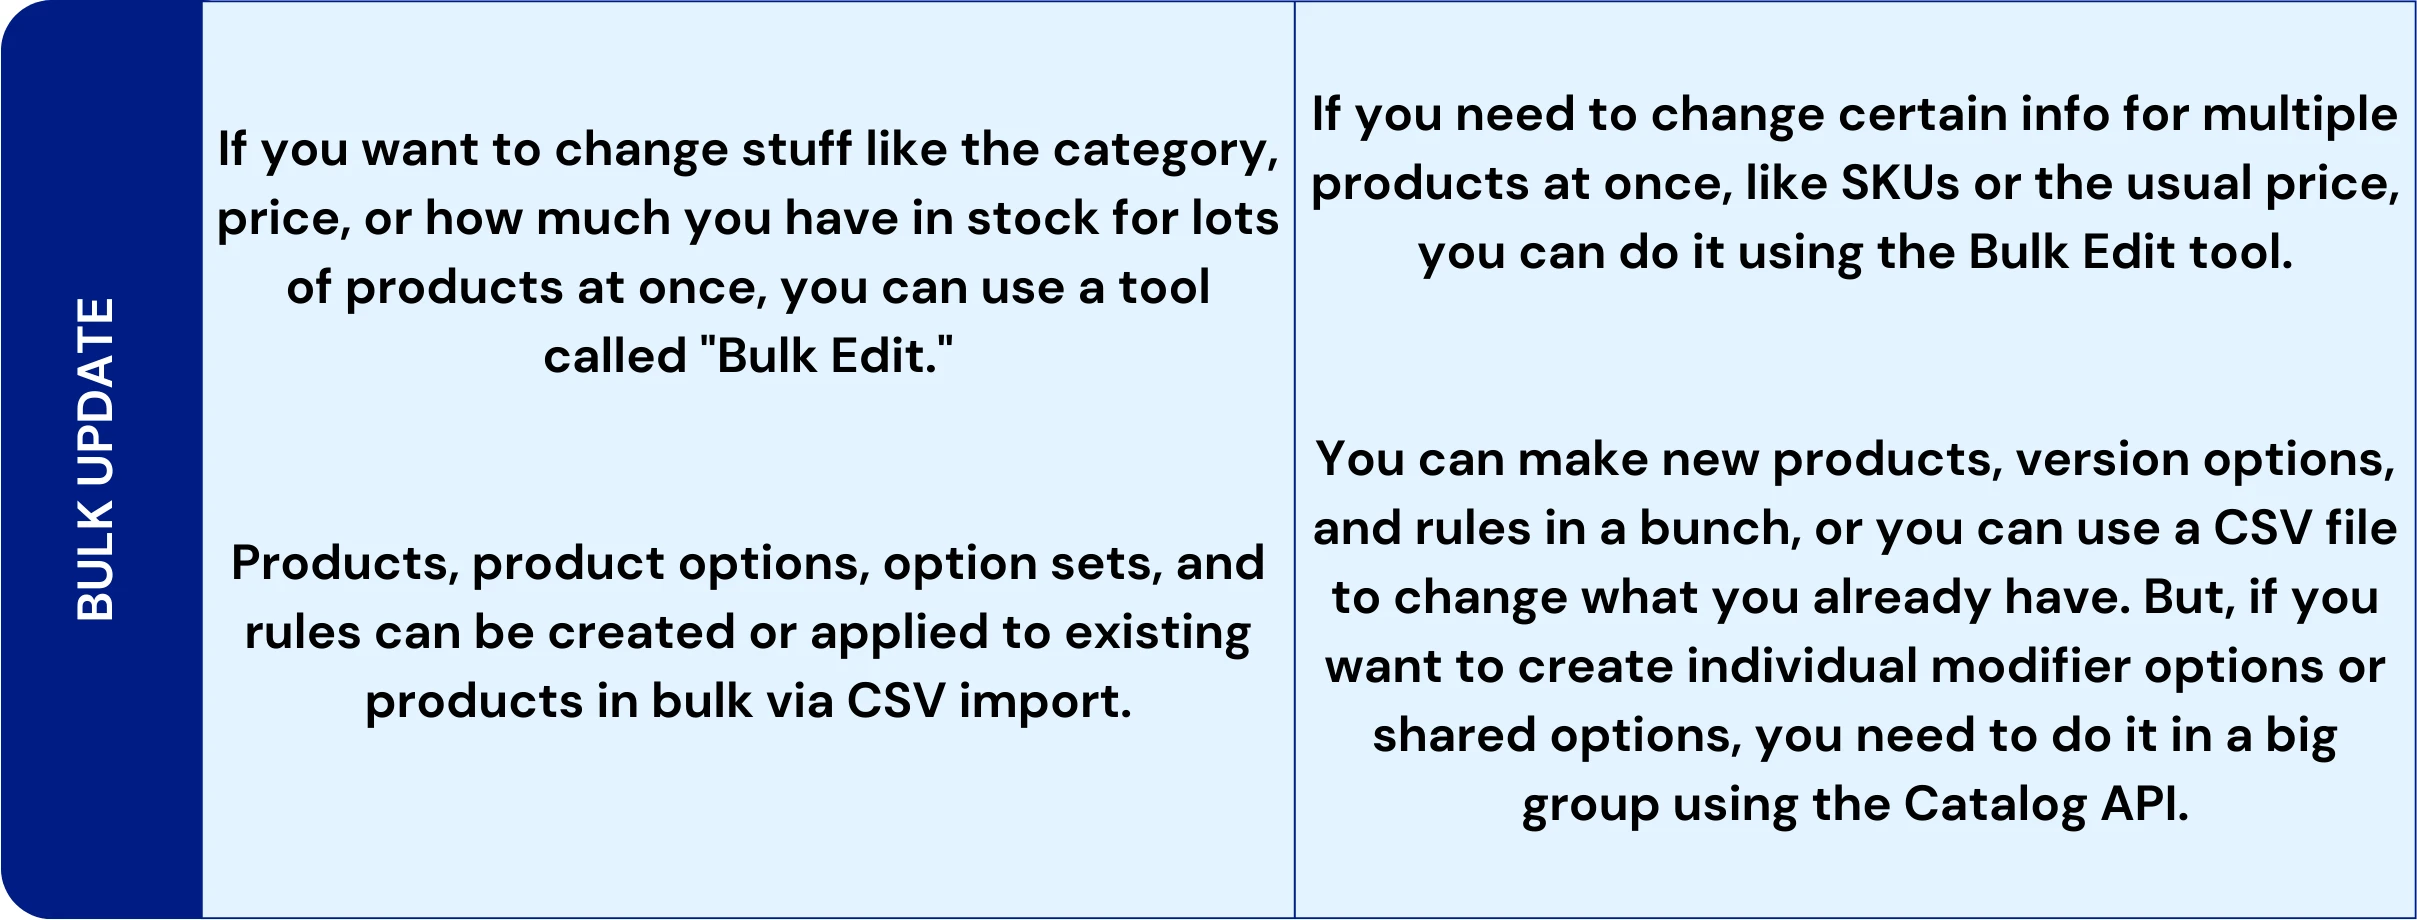
- You’ve already got a catalog full of option sets and options that you don’t want to redo.
- You want to move option sets in and out using CSV files.
- You prefer adding images to products from the Image Manager using the control panel.
- You need to bring in, send out, set SKUs, and track stock for all types of options.
- You want to choose which fields the Auto-SKU Generator uses for making SKUs.
- You like making different versions of products one by one.
- You’re handling your catalog through the API, and you can only manage shared options and modifiers in the control panel.
What You Need to Know Before Switching to the V3?
If you spot the opt-in banner while adding or changing products, your store is ready to switch to the V3 experience. Just click on “Update now” to begin the upgrade process.

If you don’t come across this banner, it might mean that you need to adjust your catalog to meet the requirements for the upgrade. This could be because some features in V2 don’t have a match in V3, or there are conflicts between V2 and V3 fields.
Before Getting Started
If you’re dealing with a large catalog, we suggest using the API method to make changes.
For catalogs where you need to keep downtime to a minimum, look at the StrikeTru app.
It’s a good idea to create a backup by making a CSV copy of your current product info and copying your image files before you start making any changes. This way, you’ll have a safety net to recover your data if something goes wrong.
If the CSV file you plan to import is larger than 20MB or has over 10,000 products, you might need to split it into smaller CSV files for the import to work smoothly.
In case you’ve already upgraded to V3 but decide you want to go back to V2, get in touch with our support team.
- We usually don’t downgrade stores to V2 unless there’s a very compelling reason.
- This option is available for Enterprise and partner sandboxes/stores.
Checklist for BigCommerce V3 Migration
In this section, we’ll go over product attributes that might need your attention before you can switch to V3.
- Option Sets: In V3, there are no option sets. Instead, you can use Shared Variant Options and Shared Modifier Options to do the same.
- Google Product Shopping (“GPS Enabled”): These fields are no longer needed in V3, but they might still be on older store products.
- Variants without SKUs: While it’s not a must, we suggest giving every product option combination (variants) an SKU before moving to V3. This helps follow best practices and avoid unexpected problems.
If your products have any of these attributes, get in touch with our support team. They can help you keep this data safe before moving to V3.
- Variant Images: You’ll need to download these and then upload them so they can be used after the switch. You also have to tell us the right path in the CSV file. Our support team can assist you to prevent losing any images.
- Swatch Images: If your products use uploaded images with the swatch option type, please contact our support team.
- Configurable Fields (deprecated): If your store has products with these old fields created before 2018, they need to be removed before you can migrate. Our support team can help you change them into V3 options.
Keep in mind that making these changes might leave your products looking incomplete in your store for a bit. They won’t have options, configurable fields, or variant images. So, it’s a good idea to put your store in maintenance mode until you finish the migration and reapply these product attributes.
Removing Option Sets & Google Product Search (GPS Enabled)
You will have to remove all the option sets assigned to your products before migrating to V3.
Disassociate your options sets from the products, and not delete them. You will reapply these to your products later on. You can do this either.
- By importing/exporting using a CSV file or
- By the control panel
CSV Import/Export Method ( For Multiple Product)
- Exporting your products
- Reimporting your products
- Clean up
- Restoring options
You can do this in bulk using the CSV import. Using this method, you can also disable the deprecated GPS-enabled field.
Step-by-Step Guide for BigCommerce V3 Product Migration
- To export your products, use the Bulk Edit template.For ShipperHQ users: You should make a custom export template. Just copy the Bulk Edit template, add the special ShipperHQ columns, and then export your products.> Shipping Groups
> Origin Locations
> Dimensional Rules - Duplicate the CSV file and keep it for your records.
- Take out all the SKU and Rule rows from your active CSV file. You can do this fast by using the “Filter” feature on the Item Type column.
- Remove all the columns from your active CSV file except for the ones listed below. This helps lower the chance of losing your product data:
> Item Type
> Product ID
> Product Name
> Option Set
> Category
> GPS Enabled - Change all the entries in the Option Set column to the same value, for example, “temp” or anything not already in your catalog’s option sets. This will disconnect the product from your existing option sets.
- In the GPS Enabled column, set all products to “N.”
- Save the updated CSV file using a unique name for easier future reference.
Reimporting Your Products
Import your products by using the edited CSV file. Choose the Bulk Edit re-import option.
![]()
Ensure that the “Ignore blank values during import” option is unchecked and proceed with the import process. Although we typically recommend keeping this option enabled during product updates to prevent accidental data loss, in this case, we are using it to cleanly remove option set data from products.
After the import, double-check your products to confirm that all option sets have been removed.
If the process is successful, you should now see the upgrade banner.
Clean Up
- Remove the “temp” option set if you used it.
- You can manually recreate product options and variants after the migration by using shared variant options and shared modifier options. Alternatively, you can use the method below to reassign options in bulk automatically.
Restoring Options
Create another copy of the CSV file you used to remove option sets and name it something like “restore-options.csv.” Edit the file and make the following changes:
- Remove the Product ID values only from the SKU/Rule rows.
- Keep the Product ID values for Product rows unchanged.
- Leave the Option Set names as they are.
Save the CSV and then reimport. Check your products to ensure that all options and functionalities have been restored.
If you encounter any errors during the import, save that information for future reference.
CONTROL PANEL METHOD (FOR A FEW PRODUCTS)
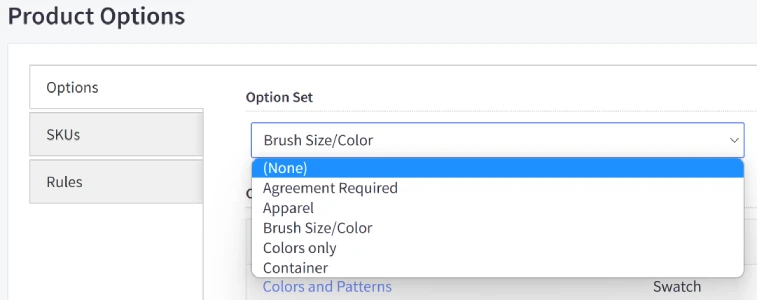
For small-scale changes, if you want to remove option sets from products individually using the control panel, edit a product, go to the Options & SKUs tab, and select “(None)” from the Option Set dropdown menu. This will eliminate any existing product options and variants from the product.
Configurable Fields
Configurable Fields, found in the old (v2) product experience under the Custom Fields tab, are deprecated fields that some stores created before 2018 might still have on their products. It’s important to note that these are distinct from actual Custom Fields.
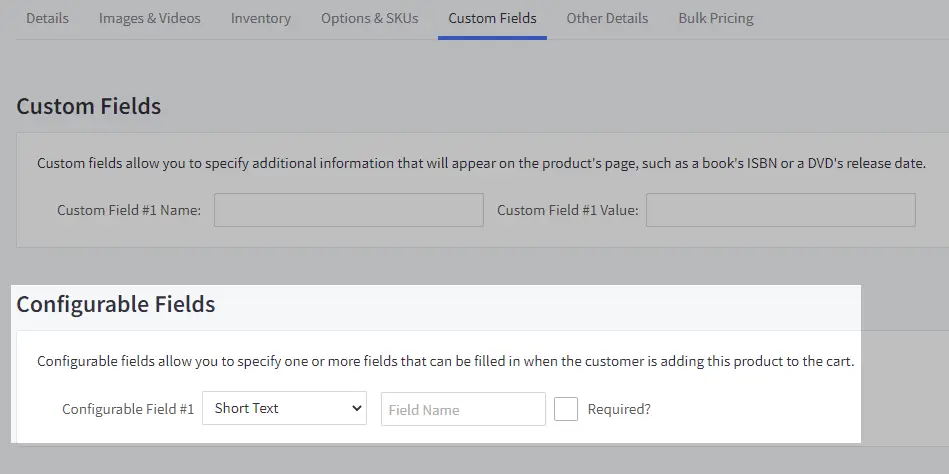
To get rid of configurable fields, navigate to the Custom Fields tab and erase any text in the Field Name. If the “Required” checkbox is checked, make sure to uncheck it. Once you’re ready, click “Save.” It’s also possible to update them through the API.
If you need to preserve your configurable field data, don’t hesitate to contact our support team. They can help you convert these fields into V3 options.
Conclusion
The shift from BigCommerce V2 to the advanced V3 signifies a pivotal advancement in your eCommerce journey. With a more streamlined interface, enhanced product management tools, and an efficient API, V3 promises an elevated shopping experience for your customers.
As you consider this transformation, remember that QeRetail is here to guide you every step of the way. Our eCommerce experts are ready to ensure a seamless migration, helping your online store thrive in the ever-evolving world of eCommerce. Contact us today to embark on your journey to BigCommerce V3, where your eCommerce future shines brighter than ever.